How to Add Cedar Shingles to a Bay Window
Views: 524

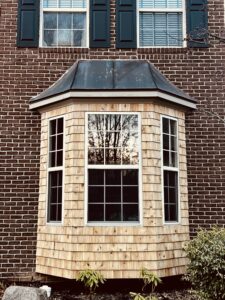
.After a recent trip to Boston, I was taken with the beauty of cedar shakes (another word for shingles). They were everywhere. Upon my return, I began looking to spruce up a small garden outside a bay window in front of my home. The bay window itself was looking a little beat up. I decided to add cedar shakes to improve the aesthetic and provide a backdrop for the garden updates. In the Midwest, cedar shakes aren’t as common as in coastal regions. I struggled to find a contractor to complete the project. Research ensued. My best guy offered to help me complete the project. Here’s what we learned about adding cedar shingles to a bay window:
First things first. Ensure the surface you plan to shingle has a waterproof underlayment. In my situation, this was already in place under the existing sheathing. Begin laying cedar shingles in courses, starting at the bottom. Make sure they are level. Alternate sizes (i.e. wide, medium, skinny and so forth) with the thinnest part of the shingle at the top and thickest at the bottom. Each row should overlap the next at a regular interval. We used five inch chalk-lines from the bottom of the existing row to create consistent spacing and ensure each subsequent row was level. Despite advice to use nail guns, we found that a pneumatic staple gun worked beautifully on all except the very top row. Because the top row is exposed (unless you opt for tips to cover them) staples would be visible which I didn’t care for. We decided to use a bit of construction adhesive (liquid nails) and small aluminium finishing nails made for cedar (we liked the khaki colour). these nails are impervious to weather and won’t discolour the shingles as they age.
Preparation:
- Framing: Ensure the bay window roof frame is properly constructed with appropriate rafters and sheathing.
- Underlayment: Install a waterproof underlayment on the sheathing to protect against water infiltration.
Shingle Installation:
- Purchase Shakes: These are inexpensive and can be purchased in bundles at big box stores. There are often LOTS that aren’t usable. Be aware of knots and cracks when selecting the ones you will install.
- Start at the bottom: Begin laying the first course of shingles at the lowest edge of the bay window roof: ensuring a consistent overhang.
- Overlapping courses: Install subsequent courses of shingles, overlapping the previous row with the thickest part of the shingle facing upwards.
- Cut to fit: Carefully measure and cut shingles to match the angles of the bay window, especially at the corners and edges.
- Fastening: Use corrosion-resistant roofing nails to secure each shingle; drive them through the upper part of the shingle to avoid splitting.
- Spacing: Maintain a small gap between shingles to allow for expansion and contraction.
- Feathering/ Weaving: A special technique used bot corners or angles. We took the time to do this as it prevent the need for trim. It is time consuming, but LOVELY and helps water flow off of the siding efficiently. Click here for a tutorial.
Important considerations:
- Planting: Don’t plant until AFTER you have finished your shingles. As someone who put in a few shrubs thinking they’d be small enough to work around, I would suggest that all landscape would happen at the end.
- Alignment: Be sure to align window sills with a row of shingles. Making the row just above or below the sill looks chaotic and messy. This may take some mathematical calculations as you being to layout the overall project, but it is worth the effort!
-
Weather conditions: Install cedar shingles in dry weather to prevent warping.
Professional help: For complex bay window designs or if you are unsure about the installation process, consider consulting a professional.The garden renovation will mainly happen in the spring. Rhododendrons were planted this fall, but as the shingles didn’t get done until the first week of December, additional plants will be installed in a few months. I’m considering some lovely window boxes cutting flowers as well. The texture and look of cedar is a stunning backdrop for the sunny, little flower garden. I’m looking forward to the wood aging to match my existing fence. For a traditional gardening update, I urge you to consider cedar shingles.
Meet Elizabeth Morse
I specialize in creating productive gardens for my clients (garden consults), showing them how to use fresh foods (private chef & cooking classes) and enjoying…
Elizabeth's Recent Posts

How to Grow Potted Pansies


