Planting Time!
Views: 729

End of April into May in the rose garden
Ladies and Gentlemen, and rose lovers of all ages. April is almost over. May is at our doorsteps, and that means roses starting to bloom here in Rhode Island. I hope that roses bloom in your area in May. If not, be patient, as June is right around the corner, and almost all areas of the northern hemisphere have roses blooming in June.
The Forsythia is just about done blooming in my garden. The azaleas are in full bloom, and I have a few daffodils showing their sunshine yellow color to the world. Things are progressing towards another great season in the rose garden.
Planting time here in Rhode Island
Now is a great time here in Rhode Island to plant roses. I have been doing it pretty much the whole month of April, and I will continue planting roses through May. Still, I have quite a few roses that need getting in the ground. I thought I’d use this subscription of my blog to share with you the way I plant roses that are bare root or potted. I will discuss roses that I buy (or make) that are the small rooted cuttings at a future time, as I do them differently. For those who do not know, I am in Zone 5B, and the methods/timing I describe work well for me. I would recommend checking with your local ARS Consulting Rosarians to find the correct time to plant bare root and potted roses in your area.
Selecting grade #1 roses
The roses that I am planting are grade #1, and you should be looking for grade #1 roses when you buy roses. The nursery that you are using should be able to guarantee that the roses you are buying are grade #1. If they are not able to give you that guarantee, chances are great that the roses that you are buying are probably not #1 roses, and you should find another nursery that will give you that guarantee. Buying roses that are of a lesser grade is not something that I would recommend, and it is well worth the money to buy grade #1 roses. You also need to know if the roses that you are buying are grafted or own root. We plant own root and grafted roses differently. The nursery should be able to tell you whether the roses they are selling are own root or grafted, and if they are not able to do so, you should find another nursery that will.
Bare root vs. potted
Bare root roses are roses that are sold without soil. They are dormant when they are shipped, and you should open them immediately after you receive them and immerse them in a bucket of water to rehydrate them. They should soak for a few hours, before planting, and yes, I will admit that I have left bare root roses in water fully immersed for a few days without any harm to the roses.
Potted roses are sold in containers and are usually actively growing at the time of purchase. I usually water potted roses before planting them. Potted roses are the roses that we buy at our local nurseries. Some nurseries online do offer gallon-sized potted roses, but they are much more expensive to ship this way than bare root.
Finding the right spot
One of the most important things to do when planting a rose is to find a suitable spot. Not all areas are appropriate, and there are a few things that you should consider before planting a rose. You need to find an area that gets a minimum of six hours of daylight. An area that gets four hours of daylight can be used, but six (or more) is much better. The spot should not be too close to trees and shrubs that have long roots that could invade the root zone of your rose and starve it of the nutrients you provide to it. Remember to choose wisely.
We need a hole for the rose
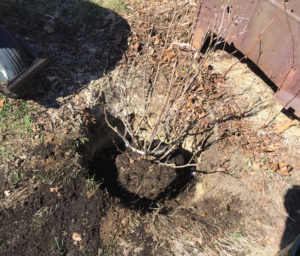
Once you have found an appropriate area, you need to dig a hole. The hole should be 2’ in diameter and a minimum of 2’ deep. It is important to dig a hole this big. This is one area not to cheat. The hole needs to be big to allow for proper drainage. I usually discard the dirt and soil that I remove when I dig the hole. It usually is of poor quality, and I use it as fill in another area of my property. With six acres of land, I have plenty of uses for this material. I also want to control the soil used when I plant my roses, and it is one less variable that I need to contend with.
Once you have your hole dug, I recommend filling it with water to see how well the water drains. The water should drain relatively quickly. If the water does not drain after a few hours, the hole should be enlarged until it drains properly.
Now that you have a hole that is dug and drains well, you are ready to start filling it in with soil. Since I have many, many roses to plant, I buy my soil by the yard from a supplier who sells directly to landscapers. The mix I buy is 50% loam and 50% compost. I use it directly the way I receive it. I do not amend it any further. If you only have one or two roses to plant, you can use a ready-mixed soil like Scotts® Premium Garden Soil. Either way works well, and it is your preference based on how many roses you need to plant.
Filling up the hole
Start filling the hole with your soil. I recommend putting a cup of bone meal or triple phosphate in at this time. I mix it with the soil at the bottom of the hole. This is a source of phosphorous for the rose, and it is added during planting, because phosphorous moves very slowly through the soil. The phosphorus will be available when it is needed. It is the only fertilizer to be added during planting.
Own root vs. grafted
Note: Both grafted and own root roses are sold as bare root and potted. If your rose is grafted, you need to locate the graft (round knob that joins the rootstock to the desired top portion). Zones 7 and below need to have this graft placed 3” – 4” below ground level. It is placed here to help insure that it is not damaged during the cold winter months. I have seen many grafted roses not planted correctly, and the rose later goes “wild” as it reverts to the rootstock. It is a very common mistake that can be rectified easily now.
When planting in zone 8, place the graft at ground level, and in zones 9 and above place it 1” – 2” above ground level. If in doubt where to place the graft during planting, I recommend contacting your local ARS Consulting Rosarians and ask them for proper placement.
Own root roses do not have a graft that needs protecting, and you do not need not worry about where to place it. Plant own root roses at the same level as they previously grew.
Continue filling the hole
Once you have placed your rose at the proper planting level, continue to fill in the hole. I fill evenly around the plant, and I go 4” – 6” above grade. This creates a “mound” of soil around the newly-planted rose. This mound helps to protect the newly-planted rose from drying out, and in time the soil incorporates into the hole as it settles.
And Now . . .
That’s pretty much how I do it. Pretty easy – just a few simple things to remember. Before you know it, you’ll be an expert. I can do it in about half an hour/45 minutes from lawn to planted rose. For the time being, I have put my rose purchases in containers, and will grow them in containers until I get time to get them in the ground. I will continue to plant them throughout the growing season and into late fall/early winter before the ground freezes.
Happy Planting
Epilogue
Well, guess what? I created this subscription to my blog entirely on the computer without any preliminary drafts using my fountain pens. I had to do it this way, because time was too short to do it the other way. Even though I said I wouldn’t do it this way, I had no choice. However, I did use a Cross fountain pen filled with bright red ink to correct my drafts as I went along. Boy, did I ever have corrections on this subscription. I need to go back to doing the other way. It’s easier in the long run.
Meet Andy Vanable
Andy's Recent Posts

The Rose-Growing World Loses an Icon – Bob Martin


