Reinforcing the Old Arbor
Views: 3623
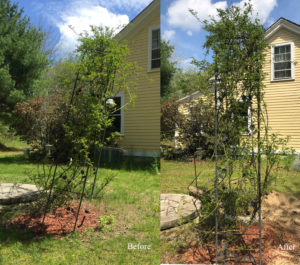
A leaning arbor
As I walked past the arbor next to the old abandoned well, I noticed it was leaning. I had straightened it a few weeks ago, but it has already tilted back to where it was before. The canes wrapping around the top of the arbor are getting more abundant and are making it “top heavy.” The ground beneath is not stable enough to keep the arbor upright. Now, I know where this is going. This is only going to get worse as more canes develop. I know that I just need to take the time to fix it.
A rose on the arbor
I’m not sure where this particular arbor came from. My parents put it up years before we bought the house. They failed to secure it to anything except the ground beneath it (as intended). That ground lies on the crest of a small hill. They designed this particular arbor to be just pushed into the ground and be done with it. The 10” long spikes are supposed to be adequate for anything that is attached to it. There is an unknown rambling rose (probably Dorothy Perkins) attached to it, that I have weaved in and out of the arbor. Un-securing the rose from the arbor will necessitate cutting out most of the canes (along with the blooms that accompany them). It will take years for the rose to regain this lost growth.
Note: For those who do not grow ramblers, they bloom on “old” (or second-year) wood. The more canes you shorten/remove, the fewer blooms you will have. I do not want to lose these canes/blooms, for it has taken years for me to build them up to where they are.
An arbor freed
To free the arbor from the ground, I wanted to unbolt the two bottom sections and secure the top to heavy captain’s chairs. My hope was that I could do this without damaging the rose and without cutting the canes. Unfortunately, after I removed the bolts from one of the bottom sections, it uprooted the spikes (both sides) and the arbor fell to the ground with a big thump. Luckily, the fall caused no damage. I was able to continue to reinforce the arbor without totally destroying the rose.
Wood vs. cement
In the past, I have used 8” x 8” wooden posts cut to length, turned sideways and lag-bolted the arbor to them. But, we had a success of our recent mailbox project (story coming to a blog soon). So, I thought that cement might be a stronger (and cheaper) option. I ran the numbers on the cost of cement vs. wood. Cement can be done more cheaply than wood (given the high cost of lumber these days). Cement also creates a more stable platform for the arbor to stand on. It also won’t disintegrate as quickly as wood does.
The 8” x 8” wooden posts that I have used in the past have also been somewhat difficult to get level and keep from shifting. Within a year or so after being installed, the ground beneath the wood posts settled, and the arbor started to lean. I’m also hoping that the additional weight that is created when using cement will compact the subsoil, and settling will be minimized.
List of materials and tools
The first thing that I did was to get a list of materials and tools needed for this project. The materials and tools that I used were as follows:
- Four full-size cinderblocks (8” x 16” x 8”)
- Four half-size cinderblocks (8” x 8” x 8”)
- Four 60 lb. bags of cement
- Water hose with water for mixing the cement
- 5′ long scrap 2″ x 4″ wood stud
- Tape measure
- Level
- Wheelbarrow
- Flat-bottom shovel
- Mattock
- Trowel
- Two 10 mm wrenches to remove/install the bottom sections of the arbor
Plan ahead
Planning ahead is key to making a project like this work. I measure often, write down my measurements on a sketch pad, and literally make a sketch/drawing to visualize exactly what I am building. I often will consult with others, to get their feedback as to whether or not I am on the right track. Tapping in to others’ experiences can often be invaluable to the success/failure of building projects such as this. No one person can have all of the answers as to what works/doesn’t work, and the more information one has, the better-informed they are.
Measure, measure, measure
The next part of this project is to measure the distance between the anchor points of the arbor. This is not only done between the actual anchor points on each side of the arbor, but the distance between the centers of the sides of the arbor. This particular arbor that I reinforced was 54” between the centers of the sides. There were three 10” “spikes” on each side of the arbor that hold them upright. They are 4” apart in the front, and 15” between the front and rear spikes. There are three spikes per side, and when you look down on them, they are in the shape of a capital “L”. They mirror each other from side to side, and there are no spikes on the back insides.
A size for the platforms
To come up with a size to use for the platforms I was making, I doubled the 4” width to 8” and increased the length to 24” (1.6 times the length). This particular arbor needs to be pretty close to an old well. Removing the well will be a project for another day, and I feel as though the extra 9″ will adequately hold the arbor in place and not have any interference from the well. As for the depth of the platforms, I chose 16” (which is the height of two cinderblocks).
Stacking up the cinderblock platforms
The ending dimensions of each platform were 8” x 24” x 16”. I chose these dimensions not only because of the old well and its close proximity to the project, but because they can be formed by putting four cinderblocks in two rows of two. Each row will have one full-sized cinderblock and one half-sized cinderblock in it. I set them so that the open part found on most cinderblocks is vertical. The top row mirrors the bottom row, but with a 180 degree rotation.
I put the half-sized cinderblock on top of the full-sized cinderblock, and the full-sized cinderblock on top of the half-sized cinderblock as well as the second half the full-sized-cinderblock. By setting up blocks mirrored in this way, each row helps to strengthen the other, and there is support for every inch of both rows. Adding cement to the voids in the blocks makes it quite strong.
Digging trenches for the platforms
After I sketched out my plan, two trenches needed to be dug for the cinderblocks. I located the centers of both sides of the arbor, marked them, and dug straight down 10”-12” across on these centers. Then, I made these trenches 28”-30” long, and 18” deep. I used my trowel and mattock to get the sides and bottoms of these holes as even as I can get them. Once I completed my trenches, I double-checked the centers of the trenches to insure that they were 54” apart.
Note: I find the mattock the best tool for loosening up dirt that hasn’t been worked in a long time. I find that a trowel is the best way to get the dimensions of a hole to just the right size. I also dug the holes in my project 18” deep (because I wanted these platforms to be covered by 2” of soil/mulch). You may want to increase/decrease the depth of your holes based in your own design preferences.
Stacking the cinderblocks in the trenches
Once I had the holes dug, I placed a large cinderblock in the hole and checked whether or not it was level. I adjusted as necessary. Note: It is very important that these cinderblocks are level. They are the basis for getting things square and keeping them that way. As things deviate from being square/level it can be very hard to get things back to where they need to be. A little extra time spent now to get these blocks square and level, will reward you many times over in the long run.
Once I had my long cinderblock level and in place, I put my half-cinderblock in place adjacent to it. The half-cinderblock also needed to be leveled, and at the same depth as the full-sized cinderblock. There was no space between the two blocks, and there was not be a step up (or down) between them. Note: Even small steps of 1/16” between blocks can make for problems later on. It does take some time to get everything in position, but it is very important to a successful build.
Leveling the second row of cinderblocks
Once I had the bottom row of cinderblocks leveled and set in place, the second row was put on top of the first row. Remember, it is important to mirror the bottom row and rotate it 180 degrees to improve the strength of the platform. I double-checked that the second row of cinderblocks was also level. Note: when the first row of blocks is stable and level, there should not be any problems leveling the second row. Cinderblocks are made with square sides and corners. They are designed to work together to keep things square and level at all times. You shouldn’t have to keep adjusting them.
Insuring that both platforms are at the same depth
Note: it is important that the second hole be at the same depth in relation to the first hole. To be sure that the second hole is at the same depth as the first hole, once you have placed your cinderblocks in their correct positions, a 2” x 4” piece of wood is put between the two holes. The board is leveled, and the distance between the bottom of the 2” x 4” and the top of the upper layers of the cinderblocks should be the same for both cinderblock platforms. If they are not the same, the blocks need to be readjusted, so that they are the same. If they are not at the same height, the arbor will be skewed.
To avoid a skewed arbor, you need to raise and/or lower the cinderblocks as needed, so that they are the same distance from the leveled 2″ x 4″. Be mindful that if you do change the height of the cinderblocks, you should double-check that they are still level to the ground. Adjust as necessary. Patience is key here.
Filling the cinderblocks
After I built the four-block cinderblock platforms, they needed to be filled with cement. I filled one platform at a time, and took my time to make sure I did things right the first time, instead of rushing through the steps. Mistakes can be made when you try to do too many things at once. Remember, Rome wasn’t built in a day, and there’s always another day coming tomorrow to finish things up. Growing roses and enjoying them is a pleasurable hobby and is not supposed to be stressful. That’s one of the reasons why we grow them, and why we sometimes just need to stop and take the time to smell the roses.
Mixing the cement
Next, I needed to mix the cement to fill the four-block walls. When I did this, I got my wheelbarrow and put in a bag of cement. I wet it down by adding small amounts water until the cement was completely wet, and there was no excess water. It usually takes about four quarts of water to thoroughly wet 60 lbs. of concrete. Note: It is best to add small amounts of water and mix thoroughly each time water is added, instead of adding it all at once. When too much water is added to concrete, it will make it “runny.” When concrete is mixed correctly, it should be completely wet throughout and be able to stand on its own. Too much (or too little) water mixed with concrete can weaken it. More dry cement is added as needed when cement becomes “runny.”
For more information on proper cement mixing techniques, I recommend researching proper techniques and/or watch videos online before starting your project.
Adding the cement
Once I mixed the concrete, I added it to the cinderblock wall. I took a shovel-full of concrete and put it in the holes in the cinderblocks. I took care to not spill it everywhere. Note: It is important too not add too much concrete at any one time and disturb the blocks in the process. I filled in the holes with shovelfuls of cement right to the top of the blocks, and finished them flush. Then, I ran out of concrete once before I completely filled the blocks, and mixed a second batch of concrete. I added more concrete as needed, while the concrete was still wet and not hardened.
Mixing small batches
Please note: it is better to mix several small batches of cement instead of one big batch that you are not able to use. You can mix a half batch, a quarter batch, or any size batch you may need. Mixing cement causes a chemical reaction (called hydration) that can’t be stopped once started. Any unused cement that you have at the end of your project can be a problem to dispose of. Plan the usage of your cement to avoid excess unused material.
Inserting the “spiked” bottom pieces
Now that the cinderblocks are full of hardening concrete, it is time for me to insert the bottom “spiked” portion of the arbor to the platform. You must insert them while the cement is workable and before it fully hardens. Note: be sure to measure first for proper placement before putting the spiked section in place. Don’t be afraid to mark as needed to guide you where to put the bottom section. Once I marked the place to insert the bottom section, I pushed it in place. The first platform was completed.
On to the next platform
After I finished the first platform, I repeated all of the prior steps on the second platform. Note: When inserting the second spiked bottom section, double-check that it is at the same height as the first spiked section. Put the 2″ x 4″ stud across the top of both bottom sections and check to see if the board is level. The second spiked lower section is moved up or down slightly until the stud is level. If you ensured that both platforms were at the same height before filling in the cinderblocks with cement, this should be a relatively minor adjustment.
Clean up time
Once you are done, you need to clean up your tools. The longer you take before you start cleaning your tools, the harder it is to clean them. The first thing to do is to remove any excess cement that you did not use from the wheelbarrow. Do this before it hardens. While working on this project, I took the liberty to dump some small portions of leftover cement in the holes beside the cinderblocks. I did not discard more than a couple of trowels-full of cement when I did this. I will later treat these small blobs like any other rock that is in my planting holes. They add drainage, and help to fill in here and there.
Getting rid of Cement
Any large amounts of cement should be discarded. In my yard, I have a hole some 20 feet wide and 10 feet deep that I’m trying to fill in. I put the unwanted cement from this project there and have used it as fill (like any other rock that I may find in my yard). If you do not have the an area like this, you may need to pay to get rid of any hardened concrete. This is another very important reason to not mix more concrete than what you need.
Once the excess cement is removed from the wheelbarrow, rinse it (along with your other tools) with water until the cement has been diluted to a point that it is just small rocks and sand and discard. Be sure to add copious amounts of water to make sure that it doesn’t reform into cement. You must dispose of hardened concrete. It can often be brought to a your local landfill (double-check if allowed in your community). If dumping is not allowed in your community, you may have to pay someone to remove it (like many other unwanted construction materials). It is best to plan ahead.
Cost for putting in these cement platforms
I bought my supplies at a local big-box hardware store, and had all of the tools in hand before starting. The project took two half days to complete, and now I do not have to worry about this arbor falling over and ruining the rose/arbor at any time in the near future. The whole project cost me under $40.00 and a little of my own labor (which costs me nothing). I expect this project that I did to be carefree and useful for many years to come.
In conclusion
Well folks, that’s my story on how I reinforced the arbor in my garden. Plus, I avoided ruining the rose attached to it in the process. The day after, the cement platforms that we installed hardened, my daughter’s fiancé and I bolted the upper portion to the lower portions. This made them embedded in the cement platforms. I only cut two small canes. (Mostly because they were interwoven in one bottom section and were more trouble than it was worth to save). Also, I damaged one cane with my mattock when I overshot the trench on one side. I may also lose that cane as well. Overall, though, most of the canes are just fine and getting ready for their mid-summer display.
Another way to use concrete is to make a frame out of 2″ x 4″ lumber and fill with cement. I initially was going to do this project that way. However, I decided that by using cinderblocks instead of a wooden frame, it was going to cost less money. Setting up these frames is the way most people use concrete. I also thought that using a “different” technique would add a less-common perspective to the many uses of concrete. If setting up lumber frames and not using cinderblocks in your upcoming projects interests you, I recommend looking at the information on the Internet.
I used this project to fix an arbor that had been a problem for many years. However, I highly recommend reinforcing your arbor as you install it. Trying to pick up the pieces and reinforce an arbor once it has been in a garden for many years is a lot more work than doing it when it is installed.
Epilogue
This story was originally written with two fountain pens – my blue trusty Osmiroid that I use daily, and my faux marble grey Watermans that I have as a backup pen. I wrote the initial story a couple of weeks ago. But, I needed to actually complete this project before I could finish the story. A lot of small details would have been missed had I not done so.
There’s still no roses blooming in my garden thus far. I’m watching all of my roses, and I see many buds, but no color is visible. My next blog should include something about my roses starting to bloom. But, in the current climate we find ourselves in, I can never be 100% sure about that.
Meet Andy Vanable
Andy's Recent Posts

The Rose-Growing World Loses an Icon – Bob Martin

Preparing Roses for Winter in November
Membership Has Its Perks

- Ask The Expert Questions
- Newsletter Archive
- PlantersPlace Magazine
- Members Photo Gallery
- Product Ratings & Reviews
- Garden Club Samples
More information about flower gardening that you’re going to want

Flower Gardening Videos

Got a Flower Gardening Question?

Learn About Osmocote Products