Growing Sprouts
Views: 232

I’ve decided to grow sprouts in my newly cleaned growing closet. The closet, which had once been home to my wintertime seed sprouting activities, became the catch-all space for plungers, power tools and spare cans of paint (like we’ll ever use those). A rainy weekend provided me ample time to revitalize the space and take up indoor growing again.
Growing Sprouts on Germination Pads
I had previously grown sprouts—mostly regular ol’ alfalfa sprouts—on a 8-in. square micropropagation pad made out of woven coconut fiber. It’s similar to the brown material you would line “hayrack” planter with, but just in mat form. I would place these pads in an appropriately sized tray, then cover the tray with a stiff sheet of plastic to create humidity that would benefit the germination process. Take the sheet off once the sprouts are about a ¼-inch tall and in 10-14 days it’s time to harvest.
This process is all well and good except for one thing. As the alfalfa seeds sprout their tiny roots grow into the fiber pad. To harvest you need to cut the sprouts off the mat. And don’t think you can pull the sprouts off the mat—I did that and had some hard-to-remove fibers among my sprouts. Growing on pads is what I believe I had seen natural food cafes do for their store-made protein shots so that’s the way I did it, too.
Growing Sprouts in Jars
After cleaning out that closet and finding my stash of sprouting equipment and old alfalfa seeds, I read the back of that seed packet familiarize myself with the process. And apparently I hadn’t read that packet several years earlier. Had I, I would have known the newly sprouted seeds should be washed 2 to 3 times each day. “How do you wash them when you grow them on this mat?” I asked myself.
An online search for “washing sprouts” informed me that washing sprouts as they grow is necessary to help prevent mold and perhaps even prevent toxin buildup. Rinsing several times a day also helps to moisten the sprouts, which helps them grow.
Again, how can you carefully rinse the growing sprouts if they are on this germination pad? It seems like many people grow their sprouts in quart jars. Fill the jar with cold water to cover the sprouts, swirl a few times and then let drain.
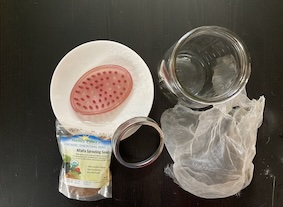
Here’s the key to draining the jar entirely without water building up in the bottom: Use a perforated lid that allows you to turn the jar completely upside down. Sprouting supply vendors sell perforated lids that fit on most Mason-like jars, so you can opt for that. I am using a portion of some bug netting (also found while cleaning out that closet) that I am covering the jar’s opening with and securing with a jar band.
For the water to drain properly, you’ll need to allow for space under the upturned jar for drainage under the lid. I have set mine on a soap dish which itself is set in a plant saucer. When I rinse my sprouts twice each day, I also rinse the soap dish and saucer.
I had previously set up grow lights on timers in the newly cleaned closet. To encourage germination I just turn off the lights completely for several days. Once the seeds are mostly germinated and about ½ inch tall, I turn the light timer on for about 12 hours each day. And so far, so good! The sprouts are tasty and add a nice flavor and crunch to salads and sandwiches. Next up for me is to try some other types of sprouts and spice things up a bit.
Meet Ellen Wells
When you’re raised on a farm, you can’t help but know a thing or two about gardening. Ellen Wells is our expert on edible gardening.…


