Grandma Ranghild’s Cardamom Bread
Views: 541

A Swedish tradition
Christmas is a time for family. My dad’s grandparents came to America from Sweden; Christmas has been a time of celebrating that Swedish heritage for as long as I can remember. When I came to college, a few of my cousins on that side of the family were in the area, and we had a cousin-Swedish-Christmas almost every year for almost a decade. Things are different now, but Christmas wouldn’t be Christmas for me without some Swedish holiday food.
This is my favorite. Grandma Ranghild’s recipe for cardamom bread is fantastic. I will give a solid nod to my grandmother, Mary, however, as she took Rang’s recipes and made them a little more standardized. Rang and I have a similar cooking style— “take a handful of this and a 5-cent bag of that and a pinch of something else (mix it ’til it looks right) then bake until done.” I actually don’t know that I could get a 5-cent bag of anything these days. But regardless, standardized measurements can be helpful.
Don’t worry, we wrote down the measurements…this time…
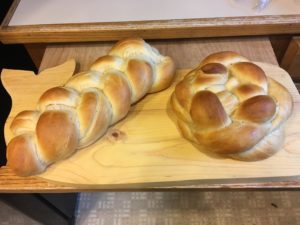
I’ve included some wisdom passed down from great-grandma Rang throughout the recipe. Braiding bread hint here, though: lay the strands out next to each other, then start in the middle. Braid three strands just like you would hair, then pinch the ends together and tug under. Turn the loaf around and finish the braid on that side, pinch, and tuck. If the strands don’t stick at first, dip your finger in water and brush it on the strands; they should stick after that.
Grandma Ranghild’s Cardamom Bread
Prep: 45 min+2 hrs rising
Bake: 20 min
Servings: 12
1 cup warm water
Scant Tbs yeast
¼ c granulated sugar
1 tsp cardamom
1 egg (at room temperature)
1/3 c powdered milk
1 tsp salt
3-4 cups bread flour
Instructions
Preheat oven to 375* F (190* C). In a large bowl, dissolve yeast in warm water. Add the sugar, cardamom, egg, and salt; beat until smooth. Add powdered milk, stir until smooth. Add enough of the flour to form a soft dough, about 3 cups.
- The needed amount of flour will change based on a number of factors—humidity, which brand of flour you use, the size of the egg, etc. Better to err on the side of too little flour and gradually add more! As you practice, you will get a better idea of what the dough should feel like and it will get easier to adjust.
Turn onto a lightly floured surface. Your counter will get messy and it will get a little sticky, so just be prepared for that. A dough/bench scraper works wonders if you have one (use plastic unless you KNOW the metal ones won’t wreck your countertop). But either way, don’t get too generous with the flour. Too much and your loaf will be tough and not shape smoothly. As you knead, it will get less sticky, so only add a little flour at a time.
Knead until smooth and elastic, about 7 minutes.
- Don’t skimp on the kneading time. Work those arm muscles! It is possible to over-knead, so again, don’t be afraid to adjust. The dough should stretch to near-transparency without tearing. This is called the “window-pane” test.
Place in a greased bowl, turning once to grease top of the dough. Cover with a slightly damp towel and let rise in a warm place until double, about 1 hour.
- Make sure the towel is slightly damp all over, but not too wet, or the moisture will react with the dough and create sticky spots!
Punch dough down; divide in half. Divide each half into 3 pieces.
On a lightly floured surface, roll each portion into a 12–13-in long rope. Leave 3 of the 6 ropes covered until you are ready to braid them. Shake off any extra flour from the ropes and braid them (follow the link for a YouTube visual); pinch ends to seal and tuck under. Repeat with the remaining dough. Place on a greased cookie sheet and cover with the towel.
Let rise until doubled; about 45 min.
Bake at 375* 20-25 minutes; check the bread for doneness after 15 minutes. Cool on a wire rack, to prevent the bottom of the loaf from over-cooking (this can happen if it is left sitting on the hot cooking pan). Brush warm loaves with butter or a powdered sugar glaze. Top with nuts or cinnamon candies.
God Jul!
Meet Sabina Säfsten
Sabina brings her love of garden-to-table cooking wherever she goes. She has cooked in restaurants, bakeshops, ice cream parlors, and catering kitchens, from prep cook…
Sabina's Recent Posts

Roasted Spaghetti Squash Bowls


