How to Plant Bare Root Roses in Your Garden
Views: 11008

This is the time of year all rosarians are thrilled with! It doesn’t matter how many roses we have in our gardens, there will always be new ones to fall in love with and add to our collection. We love browsing rose catalogs on line and in person, and then, with the arrival of spring in our neighborhoods, the roses we have ordered will arrive in a box!
Potted Plants Vs. Bare Root Plants
I have been growing roses for over forty years and I have purchased roses in pots, boxes, plastic sleeves, and bare root roses, as well. Anyone who purchases roses knows that they are not inexpensive. It usually takes some time to build a rose garden because the price can be prohibitive. I have found that the most inexpensive way to purchase the roses I need to have is to order in bare root plants. This year, I found a sale at Edmunds Roses that offered free shipping (a substantial savings) if I ordered before January 31. That is exactly what I did, and I am expecting my roses to arrive this week. I also purchased roses from CT Rose Society’s rose sale. This year, our roses came from Star Roses and Plants and we offered them to our membership for $15 each.
What Do I Do With These Sticks Covered In Prickles
If you have never bought bare root roses before, here’s what to expect when they arrive. When you open the box, it will be lined with plastic and the roses will be wrapped with some kind of damp material. Some places use wet newspaper and others use different damp materials. The canes are the top part of the new rose bush you have received and they will be bright green with prickles (usually) and will have swollen buds in the spots where the leaf petioles were last year. The lower part of the plant is where the roots are attached.
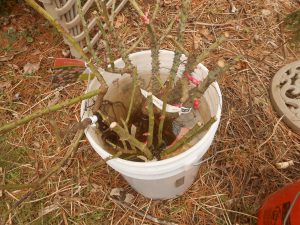
These new roses are going to be waking up fast! And, they need water to help this transition from dormancy to new canes with foliage. Make sure you have some clean five- gallon buckets, fill them up with water, and put your new rose bushes, root side down, into the water. Usually, you can fit three or four bare rooters into a bucket. Let them soak, at least overnight, and if you won’t be able to plant them right away, it’s okay to leave them in buckets for a couple of weeks. Just make sure to change out some of the water every day and refill with fresh water from the hose. This will add some oxygen to the water and keep the roots happy.
Choices On Planting Day
After your new roses are hydrated, you have a couple of options, as far as planting them goes. I usually plant my new roses in containers for about six weeks. Sometimes this will give you a happier plant the first year…why? Because April soil is generally very cold. If you plant your bare root rose directly in this cold soil it can slow the growth for a while until the soil warms with the strong spring sunshine.
Planting Roses in Containers
If you wish to plant in containers, use three-gallon nursery pots. Trim the roots back to fit the container and fill it up with quality potting soil. Water well daily, and gradually move the potted rose into full sunshine over a few days. The sun will warm the soil in the container and the roots will grow like crazy! You will want to prune the rose canes back to an outward-facing, swelling bud. This will become a cane that grows away from the center of the plant. Not only will this shape the plant nicely, but the plant will be less likely to throw a cane across the center of the rose where it could injure another tender new emerging cane. I call this procedure ‘cooking my roses’ and I grow the potted roses on a blacktop or black landscaping fabric. The rose roots will fill the pot within a month to six weeks. When you can lift the rose out of the pot and the roots remain intact, your rose will be ready to plant in the ground. When you plant the rose in the garden, be sure to bury it deep! Read on…
Planting Roses in the Ground
If you wish to plant directly into the ground, you can do that, too. Trim any broken roots and prune out the canes the same as above. Choose the sunniest spot you have in your garden. Dig a really big hole that is deep enough to bury the crown, or bud union, 4-5” below soil level if you live in a place that has really cold winters. This will protect your new rose in upcoming winters. I always say my winter protection program begins on planting day! Make a mound in the bottom of the hole and spread the roots over it like a skirt. Then, backfill the hole half-way with a mix of soil and organic material. I like to use Coast of Maine’s Bumper Crop.
When the hole is half-full, fill it with water all the way to the top and let it soak in. Then, fill the hole the rest of the way with your amended soil and mound the soil up over the canes for a few days while the rose bush acclimates to its new spot. When the soil warms up, lay down 3-4” of mulch…I like shredded pine bark. It will keep the weeds down, keep the roots cooler during the hot summer to come, and will rot into the soil, adding more organic material to the top layer of the rose bed. In 7-8 weeks, you will be celebrating your beautiful, new blossoms. Happy rose gardening!
Meet Marci Martin
Marci Martin has loved roses for as long as she can remember. From the time she was a little girl, she was fascinated with how…
Marci's Recent Posts

Roses and Friends at Race Point Lighthouse


