How To Propagate A Burro’s Tail
Views: 7198
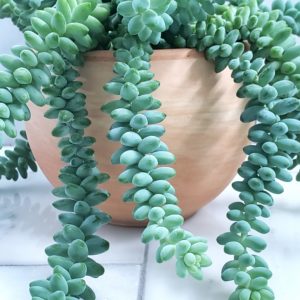
Sedum morganianum is a standout in any houseplant collection. If you live somewhere warm like California or Arizona, you’ll spot their blue beads spilling out of rustic pots, or cascading from hanging planters in the warm sun. For the rest of us, a burro’s tail sighting is rare and special. Your local nursery might get a small shipment, but they disappear fast. You can buy them online, but most stores only ship small two-inch pots, because they’re so delicate. Good news – burro’s tails regrow easily. Here’s two tested ways to propagate a burro’s tail.
Method 1 – Stem Cuttings
The stem cutting method is the fastest way to get a full grown burro’s tail. This method works well when you want to regenerate an older plant or strip away bleached or shriveled beads. Use a deep pot so you can really anchor the stems into the potting soil. This will secure trailing stems and create a fuller root system throughout the pot.
The Steps
- Cut – Clip long sections of your plant including bare or bleached stem sections.
- Strip – Gently pull off shriveled or bleached leaves from the unhealthy stem portions.
- Dry – Place your stem cuttings aside to dry for a week.
- Pot – Plant the dried stems in soil and water sparingly.
At this stage, you want to create an environment for roots to form, but don’t want the stems to rot, so hold off on watering fully. I like to keep newly potted stem cuttings away from hot sun since they can’t quite drink yet. After about three weeks, water regularly.
Method 2 – Bead Rooting
The best things usually take time. The bead rooting propagation method is a great way to salvage broken beads, so if you’ve accidentally knocked some beads off your burro’s tail stem, don’t throw them away! You can use them to grow new baby burro’s tail stems.
The Steps
- Collect – Gather healthy burro’s tail beads. Discard any dried, crispy, or yellow ones.
- Place – Organize them on a layer of soil, or lay them on the soil line of your plant.
- Dry – Let them dry for at least a week.
- Mist – Keep the soil slightly moist by spraying, then wait… and wait some more.
- Plant – Tiny root hairs will appear and baby stems will form. Plant in a shallow pot, or let them grow at the soil line.
I wasn’t kidding about the long wait. In natural light, my first little pot of burro’s beads took A FULL YEAR to grow, so don’t be surprised if yours sit and sit without any action. Grow lights help speed the process, so place them under a grow light if you have one.
Once they take off, burro’s tails require a little fertilizer and some extra TLC to thrive. If you provide the right growing environment, and successfully propagate your burro’s tail, you’ll see those blue beads spilling out of pots and cascading from hanging planters in your own home.
Meet Paula Palma
Paula has a teaching background in pilates, yoga, and meditation. She is currently studying biology as a prerequisite for further education. One of her favorite…
Paula's Recent Posts
What To Do When You Inherit A Houseplant
Make Your Own Rustic Pot
Membership Has Its Perks

- Ask The Expert Questions
- Newsletter Archive
- PlantersPlace Magazine
- Members Photo Gallery
- Product Ratings & Reviews
- Garden Club Samples
Here’s more information about gardening that you’re going to want!

Watch a Gardening Video
Learn About Osmocote Products
Read a Gardening Blog