

There is a distinct, bittersweet ritual to a Saturday morning backyard demolition. Armed with a twenty-pound sledgehammer, safety goggles, and a pair of work gloves, my hubby and I stood over our backyard fire pit. It wasn’t an ancient relic; indeed, it was a relatively young concrete-block structure that I had built (for the second time in recent years) with high hopes. Yet, looking down, it was an absolute eyesore. Jagged, spiderwebbing fractures split the blocks, and the toppers didn’t fare much better. The structure was rapidly disintegrating.
If you are currently browsing landscaping blogs or strolling through the aisles of a big-box home improvement store, you are likely being seduced by the classic aesthetic of the stone or concrete block fire pit. They look permanent and promise the rustic charm of a permanent campfire anchored in your patio layout.
However, behind that clean masonry facade lies a fundamental material flaw: concrete and intense thermal shock do not mix. After watching my own DIY masonry project turn to rubble twice, and watching my neighbours suffer the exact same backyard heartbreak, I embarked on a complete renovation.
This is the story of how I demolished my old concrete block fire pit, excavated and levelled a new gravel foundation, installed a clean retaining system, and ultimately found backyard peace with the heavy-duty, modern Edge Right Modular Steel Bonfire Fire Pit (available at Edge Right).
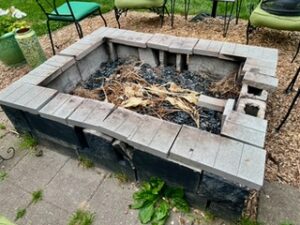
My Fire Pit Before Demolition, photo by Elizabeth Morse
A Neighbourhood Epidemic: The Problem with Concrete
Before demolition, I thought my cracking fire pit was an isolated incident of user error. I blamed myself. Did I use the wrong mortar? Were the blocks subpar that I purchased from the local nursery? Perhaps I let the fire get a little too hot during that autumn bonfire party? And remember, this was my second firepit. The answers arrived over the back fence.
Within a two-week span, two different neighbours were in their yards doing the exact same thing: hauling away broken pieces of masonry. One neighbour had invested in a beautifully pre-cast, heavy concrete ring kit. Another had meticulously stacked expensive interlocking wall blocks. Yet, regardless of the price point or the installation method, every single one of our fire pits suffered from the same fatal flaw. They simply could not stand up to the extreme thermal expansion and contraction cycles of a real wood fire.
Thermal Stress in Backyard Fire Pits: The Skinny
I garden and have big, old trees. We USE our firepits seriously. When you light a fire, the interior temperature of the pit skyrockets within minutes. Meanwhile, the exterior of the concrete remains closer to the ambient air temperature. This forces the inner face of the concrete to expand rapidly while the outer face remains rigid: it cracks under internal pressure.
Worse yet, concrete is porous. It absorbs groundwater and morning dew like a sponge. When the fire gets hot, that trapped moisture instantly flashes into pressurized steam. Over time, this pressure blows the faces off the blocks, leaving you with a crumbling, dangerous mess.
The $2,500 Dilemma and Shifting Expectations
After accepting that standard concrete blocks were a losing battle, I looked into premium upgrades. I wanted something that would look architectural, feel permanent, and survive a lifetime of hot fires. That search led me to a stunning, natural black granite fire pit at a local stone yard. It was a beautiful sculptural masterpiece. Tho a little smaller than I wanted. Then came the price tag: $2,500, excluding delivery and movement. Each piece was too heavy for one person to install, even with a helper.
Spending thousands of dollars on a backyard hole to burn logs seemed absurd. It triggered a complete reassessment of my landscaping goals. I had already built and replaced two cheap concrete fire pits over the last five years. I knew that taking the cheap route meant doing the work all over again in a few years. However, dropping thousands on solid granite felt like an over-correction.
I needed another option. I needed a material that offered the permanence of stone, the clean lines of contemporary architecture, and a price tag that wouldn’t clear out my bank account. That is exactly where heavy-gauge industrial steel shines. By stepping away from the stone yard and looking into structural steel engineering, I found a solution that was incredibly robust, beautifully modern, and highly cost-effective.
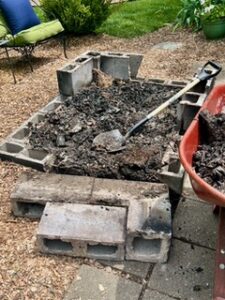
Demolition – Heavy & Messy, photo by Elizabeth Morse
Step-by-Step: The Hardscape Preparation
A fire pit is only as good as the ground it sits on. If you place a heavy steel pit directly onto uneven grass or shifting topsoil, it will settle awkwardly, trap moisture underneath, and become a magnet for weeds. To do this right, I committed to a full ground-preparation process.
Phase 1: Excavation and Levelling
Once the remaining chunks of old concrete were hauled off, I staked out a 6-foot square around the old burn zone. Using a square-nosed spade, I (and by “I”, I mean my amazing husband!) excavated the entire area down to a depth of four inches. Then I [he] levelled the subsoil, compacting it until the ground felt solid. We wanted to be sure the bed was level: no high spots or dips.
Phase 2: Retention
To contain the gravel and establish a crisp, permanent boundary between the fire zone and the surrounding lawn, I installed a flexible plastic landscape border. I opted for a commercial-grade, heavy-duty edging strip secured with extra-long 10-inch heavy spikes driven deep into the compacted earth every 12 inches. This flexible border allowed me to form a minimalist edge to keep my patio stone corralled for years to come.
Phase 3: The Pea Gravel Base
With the perimeter locked down, I filled the basin with about three inches of pea gravel. It’s an effective choice for fire pit surrounds for a few key reasons:
- Excellent Drainage: Rainwater passes through it instantly, preventing puddles.
- Ergonomics: It shifts comfortably underfoot, creating a stable yet forgiving walking surface.
- Fire Safety: It is completely non-combustible and creates a beautiful, neutral colour contrast against dark metal or lush green grass.

Spreading Pea Gravel, photo by Elizabeth Morse
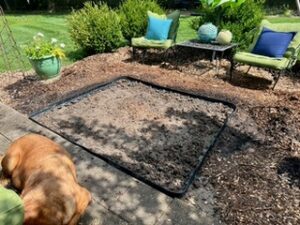
Getting the Edging in Place, photo by Elizabeth Morse
Discovering the Edge Right Modular Steel Bonfire Pit
With a foundation waiting, it was time to introduce the centrepiece. After weeks of digital deep-diving and forum lurking, I chose the Edge Right Modular Steel Bonfire Fire Pit. What immediately caught my eye was its material specification. This isn’t the thin, stamped sheet-metal you find sitting on the clearance racks at big-box retail stores. The Edge Right Bonfire Pit is fabricated from ultra-thick, heavy-duty core steel, boasting a substantial thickness that commands respect the moment you try to lift it.
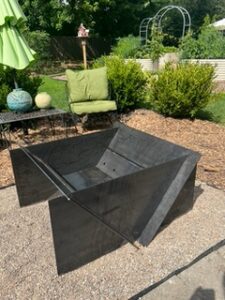
Assembled, Placed and Conditioned, photo by Elizabeth Morse
The modular panel design is perfect. It ships efficiently in flat panels, boxed separately, making them easier to manage. (Shipping was included free). Assembling it was incredibly straightforward. The panels lock together forming a rigid piece of ironwork. No tools required to assemble!
The dimensions are perfectly proportioned for real-world backyard utility. On my property, I am constantly dealing with fallen tree limbs, thick brush, and large amounts of woody lawn refuse. This pit handles large, awkward branches with ease, keeping the logs safely corralled inside its walls while providing maximum airflow for a hot, efficient, clean burn.
Despite its rugged utility, it completely avoids looking like an industrial burn barrel. The clean lines give it a striking, sculptural aesthetic that anchors my outdoor living room with a sophisticated, timeless look.
Controlling the Finish: The Linseed Oil Trick
One of the most fascinating aspects of raw steel outdoor features is how they interact with the elements. If left completely untamed, heavy-core steel will slowly oxidise, developing a rich, velvety, deep-orange patina over a couple of seasons. This weathered steel look is highly sought after by high-end landscape architects, and many homeowners choose to let nature take its course.
However, for my patio layout, I wanted to slow down the aggressive weathering process. I wanted to preserve a darker, more industrial, raw iron aesthetic for as long as possible while still letting the metal mature gracefully. To achieve this, I turned to a classic blacksmithing and woodworking trick: raw linseed oil.
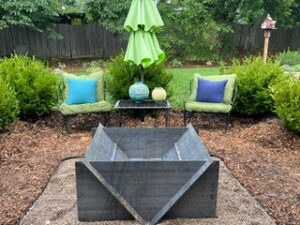
Before Coating With Linseed Oil, photo by Elizabeth Morse
Before lighting the first fire, I took some steel wool and rubbed off any orange already visible. Then I wiped it dry with a micro-fibre cloth. Next, I poured a small amount of raw linseed oil onto a clean rag and buffed a very thin, even layer across the entire steel structure. Linseed oil is a natural product. When applied to raw steel, it penetrates the tiny pores of the metal and undergoes a natural polymerization process as it cures. Just like “seasoning” a cast-iron skillet. When exposed to the initial heat of your first few fires, the oil essentially bakes right into the steel, creating a durable, water-resistant, heat-tolerant protective glaze. It darkens the steel to a gorgeous, deep gunmetal grey and severely slows down the onset of rustic orange corrosion. It is an incredibly easy, inexpensive maintenance step that gives you complete control over how your investment ages.
Weighing the Options: Pros and Cons
To help you decide if making the jump from traditional masonry to heavy steel is right for your backyard, here is a transparent breakdown of the pros and cons I discovered during this project.
The Pros
- Ultimate Thermal Durability: Thick steel panels expand and contract uniformly without structural degradation. It will never crack, shatter, or spall, no matter how hot the fire burns.
- Refuse Capacity: The deep, wide footprint lets you load large logs, thick yard waste, and awkward branches without constantly needing to chop them down into tiny pieces.
- Sculptural Aesthetics: The clean, unadorned silhouette offers a high-end contemporary look that seamlessly matches modern patio furniture and landscape designs.
- Portability & Modular Convenience: Because it is built from interlocking panels, you can disassemble it if you move houses or want to relocate your fire area to a different part of your lawn.
- Value for Money: It offers a premium, high-end architectural look and lasting structural longevity for a tiny fraction of the cost of a solid natural granite ring.
The Cons
- Surface Hot Spot: Steel conducts heat exceptionally well. The outer walls get incredibly hot during a fire, meaning you must keep children and pets at a safe distance.
- Surface Evolution: If you want a fire pit that stays looking perfectly pristine, uniform, and factory-new forever, raw steel is not for you. Even with a linseed oil coating, it will slowly change colour, patina, and react to the environment over the years.
- Ground Heat Transfer: Because it sits directly on the ground, the intense downward heat radiant will scorch any grass directly underneath it. It absolutely requires a dedicated non-combustible base like pea gravel, crushed granite, or paver stone.

The New Fire Pit in Action, photo by Elizabeth Morse
The Long-Term Verdict
I have no regrets. My choice made a massive visual upgrade to my home. By stepping away from the fragile allure of concrete blocks and investing in heavy-duty engineering, we finally broke the frustrating cycle of backyard repairs and created a fire feature built to endure.
Related Featured Articles
Related Videos

Related Blogs


Here’s more information about gardening that you’re going to want

Watch a Gardening Video

Learn About Osmocote Products

Read a Gardening Blog

Find a Gardening Podcast
Membership has its perks!
Become a PlantersPlace member! Registered users can ask Marianne Binetti questions, create personal photo gallery and post product reviews.