Seed Starting Part 3: As Seedlings Grow Indoors
Views: 715
In two previous posts on starting seeds I discussed how to prep for the seed-starting process (Part 1) and what to do as you get down to sow your seeds indoor (Part 2). Now that your seeds are sown, let’s discuss a few tasks that happen between now and the time your seedlings can head outside.
Watering Your Seedlings
Overwatering is one of the major causes of plant demise inside the home. It’s like we’re caring for them to death! The same can happen with seedlings. Seeds do need a moderate amount of moisture to begin germination,. Moisture also helps create a humid environment, also good for seedling growth. But too much moisture can and not-warm-enough temperatures (below 60F) can lead to a fungal growth that results in something called damping off. This is a pathogen that weakens emerging stems and can show as fluffy whiteness on seeds and the potting mix.
What to do? Use clean and sterilized pots, seed-starting mix and tools. Keep temperatures warm, around 70-75F (use a heating pad under your seed trays if needed). And don’t go overboard with the watering.
Turning Your Seedlings
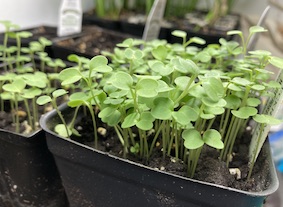
Even if your seedling pots are under grow lights, not all portions of the pot will receive the same amount of light. You’ll notice they will start leaning to one side. This makes for weakened plant growth. Seedlings may become intertwined, especially if you planted several seeds in one container.
Simply turn the pot a quarter turn every day or two. If you have a long row of pots you may also change the pots along that row, moving the one on the far right to the far left, and pushing the whole row down one space.
Spacing Your Plants
If you have scattered a bunch of seeds in one pot to have them germinate, those seedlings will become crowded, resulting in entangled leaves and roots. The pot just doesn’t offer enough room for them to all grow together. You have two options:
- Thin your seedlings. Sacrifice some of the seedlings by pulling them up and removing them, creating more space between the seedlings that remain in the pot.
- Transplant your seedlings. Prepare additional pots with seed-starting mix. When your seedlings have two or three sets of leaves, you can tease out a few seedlings from your original pot and carefully plant them into the other containers. Let’s say your original pot has 20 small seedlings. Take out 10 and plant in the other pot. When those start to crowd each other, transplant them again. Depending on the growth rate and when you can safely plant outside, you may do this several times as the plants grow. You may end up with just one or two strong plants in each pot. Imagine what those seedlings would have grown into if they were all in the same pot?
Meet Ellen Wells
When you’re raised on a farm, you can’t help but know a thing or two about gardening. Ellen Wells is our expert on edible gardening.…
Ellen's Recent Posts
Rati-Tail Radish Review
Grow Fava Beans and Improve Your Soil
Membership Has Its Perks

- Ask The Expert Questions
- Newsletter Archive
- PlantersPlace Magazine
- Members Photo Gallery
- Product Ratings & Reviews
- Garden Club Samples
More information about edible gardening that you’re going to want

Edible Gardening Videos

Edible Gardening Podcasts

Got a Edible Gardening Question?